Getting Started with Your Reseller Package: How to Access the WHM Control Panel
Once your reseller hosting package is active, the first thing you’ll want to do is log into WHM — Web Host Manager — and configure your infrastructure. WHM is the reseller-level management interface that sits above individual cPanel accounts: you create hosting packages, set resource quotas, manage cPanel accounts, and monitor your server from here.
This guide walks you through accessing WHM from the Domain Name API control panel, step by step.
What is WHM (Web Host Manager)?
WHM is the administrative layer above cPanel. Think of it as the reseller’s dashboard: while your end-users manage their own websites through individual cPanel accounts, you manage those accounts — and the resources behind them — through WHM.
From WHM you can:
- Create and terminate cPanel accounts for your clients
- Define hosting packages with disk space, bandwidth and email quotas
- Monitor server load, disk usage and account status
- Install SSL certificates and manage DNS zones
- Set reseller permissions and sub-reseller access
Important: WHM is only available on Linux reseller packages running cPanel. Windows reseller packages use Plesk instead.
Prerequisites
- An active Linux Reseller Hosting package in your Domain Name API account
- A domain name assigned to the package (for example, yourdomain.com)
- A modern web browser (Chrome, Firefox, Safari, or Edge)
Note: WHM runs on port 2087. If you’re on a corporate network, this port may be blocked by a firewall. Ask your network administrator to whitelist it if needed.
Step-by-Step: Accessing WHM from the Domain Name API Panel
Step 1 — Go to Hosting Management
Log into your Domain Name API account. In the left sidebar, navigate to Reseller Hosting → Hosting Management.

The page lists all active reseller packages. For each row you can see:
- Package name and operating system (Linux / Windows)
- Domain name assigned to the package
- Panel type: cPanel (Linux) or Plesk (Windows)
- Status, expiry date and days remaining
- An Actions column on the right with an arrow icon and a gear icon
Shortcut: Clicking the arrow icon next to a cPanel package takes you directly to WHM. Use the gear icon to view credentials first.
Step 2 — Open the Control Panel Tab
Click the gear icon in the Actions column of your cPanel package. A dialog opens — switch to the Control Panel tab.
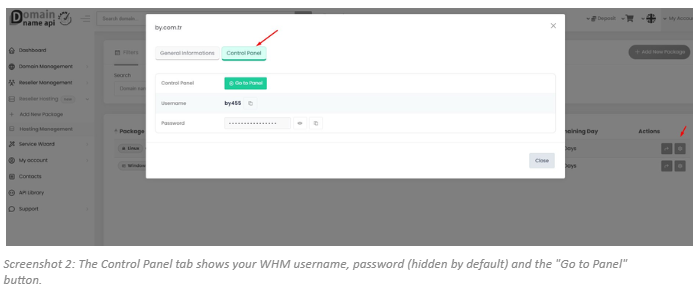
This screen shows three things:
- Control Panel → "Go to Panel" button: clicking it opens WHM directly in a new tab.
- Username: your WHM login username. Use the copy icon to copy it to your clipboard.
- Password: hidden by default. Use the eye icon to reveal it, or copy it directly with the copy icon.
Tip: Save your username and password in a password manager before your first login. If you later change your WHM password, this screen will reflect the update.
Step 3 — Log Into WHM
Click "Go to Panel". Your browser will open the WHM URL, which follows this pattern:
https://yourdomain.com:2087 or https://yourdomain.com/whm
On the WHM login screen, enter your username and password, then click Log in.
Note: If your browser shows an SSL warning, click Advanced → Proceed to site. This is expected right after package provisioning when a shared certificate is in use. The warning goes away once a dedicated SSL is configured for your server.
Accessing Plesk on a Windows Reseller Package
Windows reseller packages use Plesk instead of cPanel/WHM. The steps are identical: Hosting Management → Actions gear → Control Panel tab → Go to Panel. The Plesk URL uses a different port:
https://yourdomain.com:8443
First Steps Inside WHM
Once you’re logged in, work through these five steps before provisioning any client accounts:
Step 1: Change your password: go to Account Functions → Change Password and set a strong, unique password.
Step 2: Create a package: go to Packages → Add a Package and define the resource limits (disk, bandwidth, databases, email accounts) for each hosting tier you plan to offer.
Step 3: Create your first cPanel account: go to Account Functions → Create a New Account, assign a domain and apply the package you just created.
Step 4: Verify nameservers: go to DNS Functions → Edit DNS Zone and confirm the DNS records for your domains point correctly.
Step 5: Install an SSL certificate: go to SSL/TLS and run AutoSSL to eliminate browser warnings across all hosted domains.
Tip: Before making changes to advanced WHM settings, look up the relevant topic in the official cPanel documentation at docs.cpanel.net.
Accessing a Client’s cPanel Directly from WHM
Once you’re inside WHM, you can open any client’s cPanel account without knowing their password. This is one of the most useful reseller features.
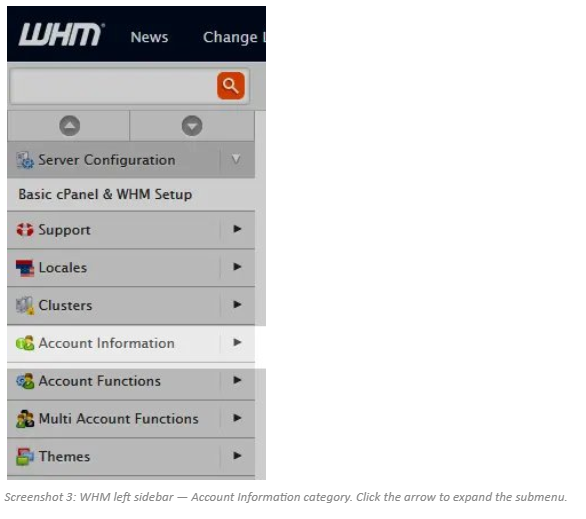
Step 1 — Click Account Information
In the WHM left sidebar, find the Account Information category and click the expand arrow next to it.
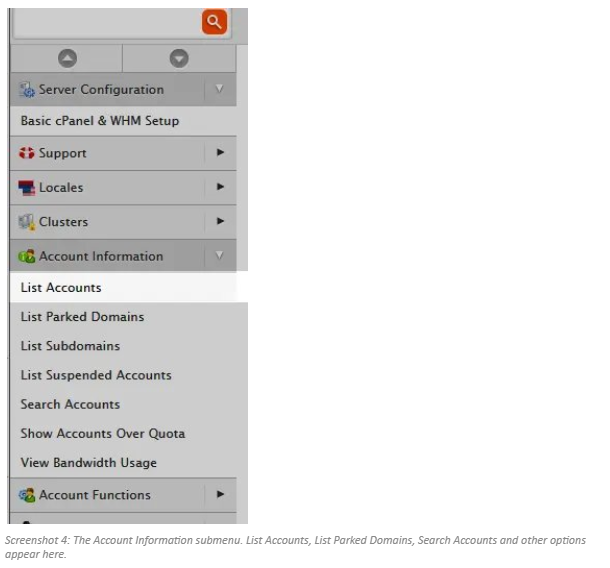
Step 2 — Select List Accounts
From the expanded submenu, click List Accounts.
Step 3 — Click the cPanel Icon
The List Accounts page shows all cPanel accounts under your WHM. Each row displays the domain, username, quota, disk usage and package. To open a specific account, click the orange cP icon in that row.
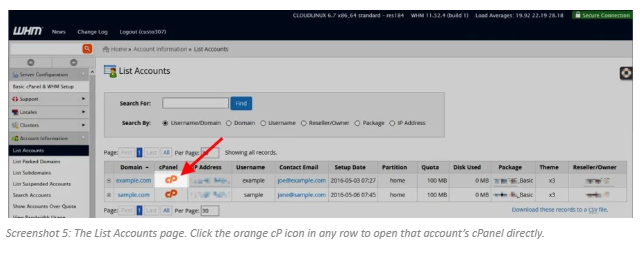
Tip: Use the Search For field at the top of the page to find an account by domain name or username. Saves time in large portfolios.
Step 4 — cPanel Opens
The selected cPanel account opens immediately. A blue banner at the top reads "You are logged in with the reseller or root password" — confirming you have full management access without needing the client’s credentials.
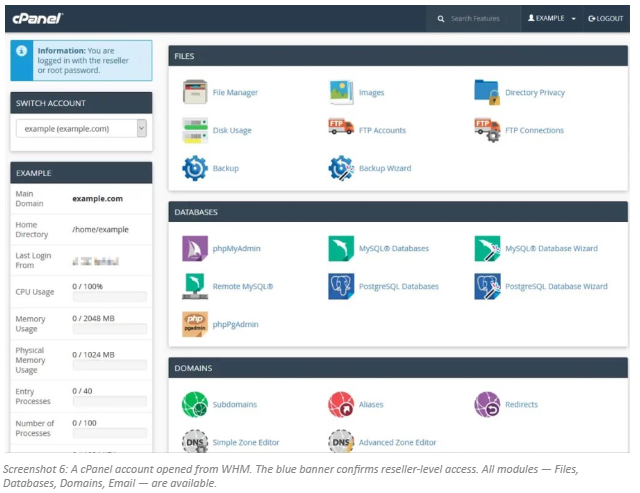
Note: When you access a cPanel account through WHM, you have full control over that account. Any changes you make take immediate effect on the live hosting environment.
What Can You Do Inside a cPanel Account?
From a client’s cPanel — accessed via WHM — you can manage the full hosting environment:
- File management: File Manager, FTP accounts, backups
- Database management: MySQL, PostgreSQL, phpMyAdmin
- Email accounts, forwarders and autoresponders
- Subdomains, parked domains and redirects
- SSL certificate installation and renewal
- Cron jobs and background processes
Troubleshooting
I can’t reach the WHM URL
Port 2087 is likely blocked on your network. Try these steps:
- Switch to a different network (mobile data, a different Wi-Fi) and try again.
- Confirm the domain assigned to your package has its nameservers pointing to Domain Name API’s infrastructure.
- Check the nameserver values in Hosting Management → General Informations tab.